What is tataki(三和土)? Disadvantages and modern examples of house with tataki.
Tataki(三和土) was originally one of the finishing methods for earthen floors. Today, however, due to its disadvantages, the term has become used to refer to earthen spaces, and other materials have replaced the finish. If you are interested in creating a stylish tataki, take a look at these modernized finishes.
This article explains the overview of tataki, points to note, and what kind of finish is used as tataki nowadays. It also introduces several examples of modern-style tataki, so you can get an idea of what kind of finish you can use to make your home more stylish.
First, here are the summary points of this article.
- Tataki was originally one of the methods of hardening the surface of earthen floors.
- The term has now changed to refer to the area around the entrance where people walk with their shoes.
- If you ask a craftsman with skills, the finish will be very hard and can be applied outdoors or in the garden.
- It is susceptible to cracking, requires experience and knowledge for construction, and has drawbacks such as construction time and cost.
- Making them clean and crack-resistant requires a high level of skill and a lot of work, and DIY may lead to disappointing results.
- It has many disadvantages for use in earthen finishes and is now being replaced by other materials such as tile and mortar.
<Table of Contents>
- 1.Tataki is the finish of the entrance earthen floor
- 2.The term now refers to a aerthen floor space
- 3.Can be installed outdoors or in the garden
- 4.4 Disadvantages of tataki
- 5.DIY of tataki is difficult
- 6.How to make tataki
- 7.Materials used in replacement of tataki
-
8.9 examples of houses with tataki
- 8-1.Modern tataki with tile finish
- 8-2.Mortar-finished tataki in an old private house
- 8-3.Natural stone and gravel washout tataki
- 8-4.Ooya-stone tataki in green
- 8-5.Simple modern Japanese style tataki
- 8-6.Western-style entrance tataki
- 8-7.Tile tataki with wood stove
- 8-8.Tataki in the living room
- 8-9.Tataki connects two households
- 9.Summary
1. Tataki is the finish of the entrance earthen floor
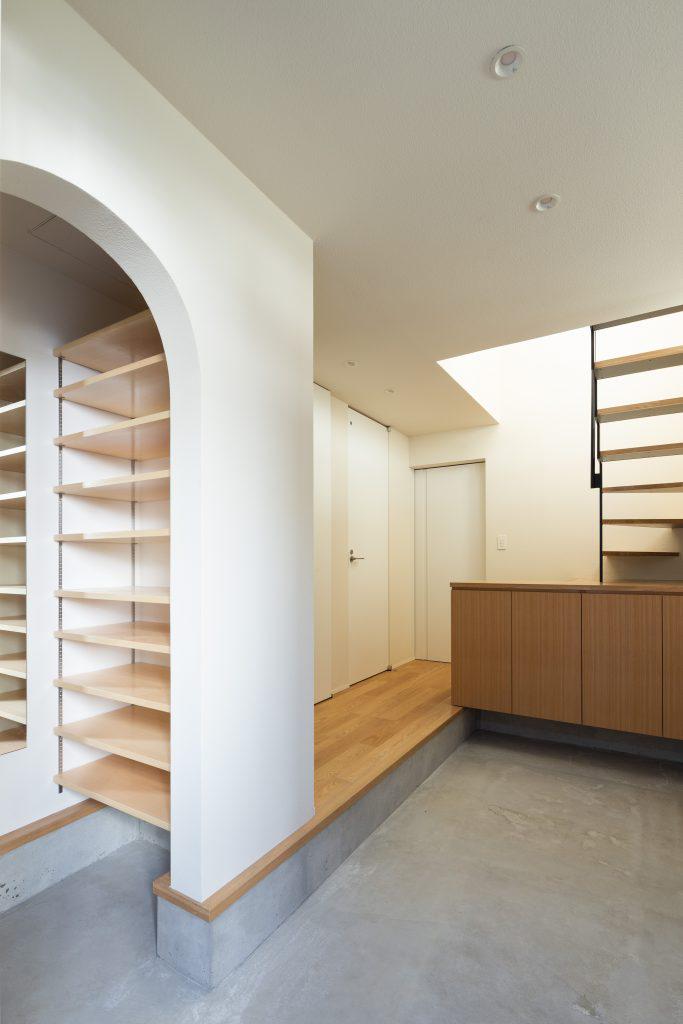


Tataki was originally a type of floor finish for the earthen floor in the entrance hall, where people walked with their shoes on. In the old days, earthen floors were bare and often chipped or worn, so tataki was conceived as a way to provide a hard finish.
Tataki is a mixture of clay, slaked lime, and bittern, which is then pounded to harden.
2. The term now refers to a earthen floor space
Today, because of the disadvantages of tataki, which will be discussed later in this article, it is used less and less as a finishing touch. Instead, the term tataki is used to refer to "the space around the entrance where people put on their shoes and walk around". Incidentally, the word "Doma" (earthen floor) was originally used to refer to the earthen finish of the entranceway. Today, however, like tataki, the word "doma" has come to mean the space around the entrance where people walk with their shoes.
3. Can be installed outdoors or in the garden
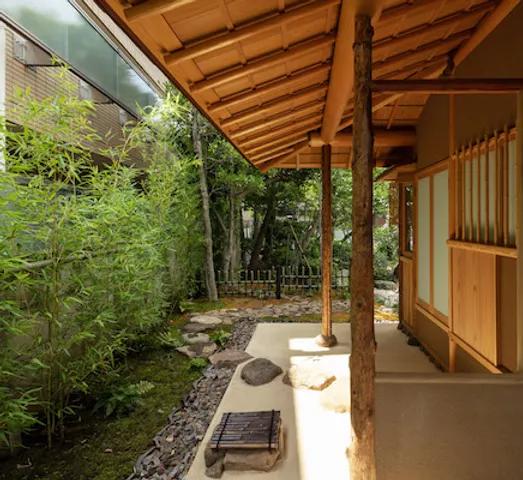


Tataki installed by highly skilled craftsmen with extensive experience is quite hard. For this reason, it can be constructed outdoors and in gardens, and will not crumble even when exposed to rain. However, if the material is not carefully and meticulously pounded with a mixture of materials that matches the temperature and humidity when it is made, it will chip or crack when wet with rain.
Even hard tataki can be worn away in areas where raindrops fall, such as under the eaves of roofs. In such areas, gravel or other materials are used to create a "rainfall drop" to prevent raindrops from chipping away. Thus, making tataki outside or in a garden requires a high level of skill and careful attention to detail in garden construction. When making tataki outside, we recommend that you entrust it to a craftsman with an abundant experience in construction.
4. 4 disadvantages of tataki
In the past, tataki was often used because there were few methods of finishing hard surfaces where people walked. Today, however, there are other finishes such as tiles and mortar. Compared to these, tataki has the following disadvantages, and its use has gradually decreased.
4-1. Prone to chipping and scraping
Tataki is very hard, but it still chips and scrapes when walked on with shoes or placed on hard objects. Tataki is a hardened material made by pounding soil, etc., and is not as strong as ceramic tiles.
4-2. Extensive experience and knowledge required
To make tataki hard enough, the ratio of materials must be adjusted according to the type of soil, the temperature and humidity at the time of construction, and other factors. Therefore, extensive experience in the construction of tataki and extensive knowledge of the materials are required.
4-3. Long construction period
Compared to other finishing materials, tataki takes longer to construct. It takes several days to prepare the base, spread the material, and pound it, and another 10 days to 2 weeks at the earliest for it to dry and harden, and sometimes more than a month depending on the season and type of material. During this time, it is not possible to walk on the surface, which delays the entire construction of the house if it is a new building.
4-4. Higher cost
The cost of tataki construction starts at several tens of thousands of yen per square meter, which is higher than that of mortar or tiles. This is due to the labor-intensive construction work and the fact that there are few craftsmen who can do high-quality work.
Because of these disadvantages, today, tataki is often partially installed for its tasteful texture. It is much less common to be installed in areas where people wear conventional shoes and walk.
DIY of tataki is difficult.
Making tataki clay as a DIY project can be quite challenging. To finish it well requires knowledge of material mixing based on experience, as well as time and strength to continue pounding gently and patiently. Even if any of these elements are missing, tataki is prone to cracking and floating.
It also requires a high level of skill to finish the surface flat and smooth, and the result may be disappointing for the time and expense involved. It is better to have a professional craftsman do the work, especially if you want to make tataki in places that will be seen by the public.
6. How to make tataki
For reference, the following is a rough description of the specific process of making tataki.
- Place crushed stones
- Mix materials
- Install the first layer
- Install the second layer
- Finishing touches
The subsoil in the area where the tataki is to be made is leveled, and crushed stones are placed on top of it and firmly compacted with a compaction machine or other equipment. Insufficient compaction will result in cracking and floating after completion.
Tataki is finished in two layers, but each layer is made of a different mixture of materials, so the materials are mixed twice. The first layer consists of four types of soil, sand, slaked lime, and bittern, while the second layer consists of three types of soil, slaked lime, and bittern.
Water is poured over the crushed stone and the first layer (underlayment) material is laid down and slowly and carefully tapped until it is about half as thick as the first layer.
Next, the second layer of material is laid down and tapped slowly and gently. The second layer is then slowly and gently tapped, taking more time to make it harder than the first layer, and occasionally checking for levelness with a flat wood.
Finally, the surface is smoothed with an iron while water is applied. After that, the surface is dried for several weeks to complete the process.
7. Materials used in replacement of tataki
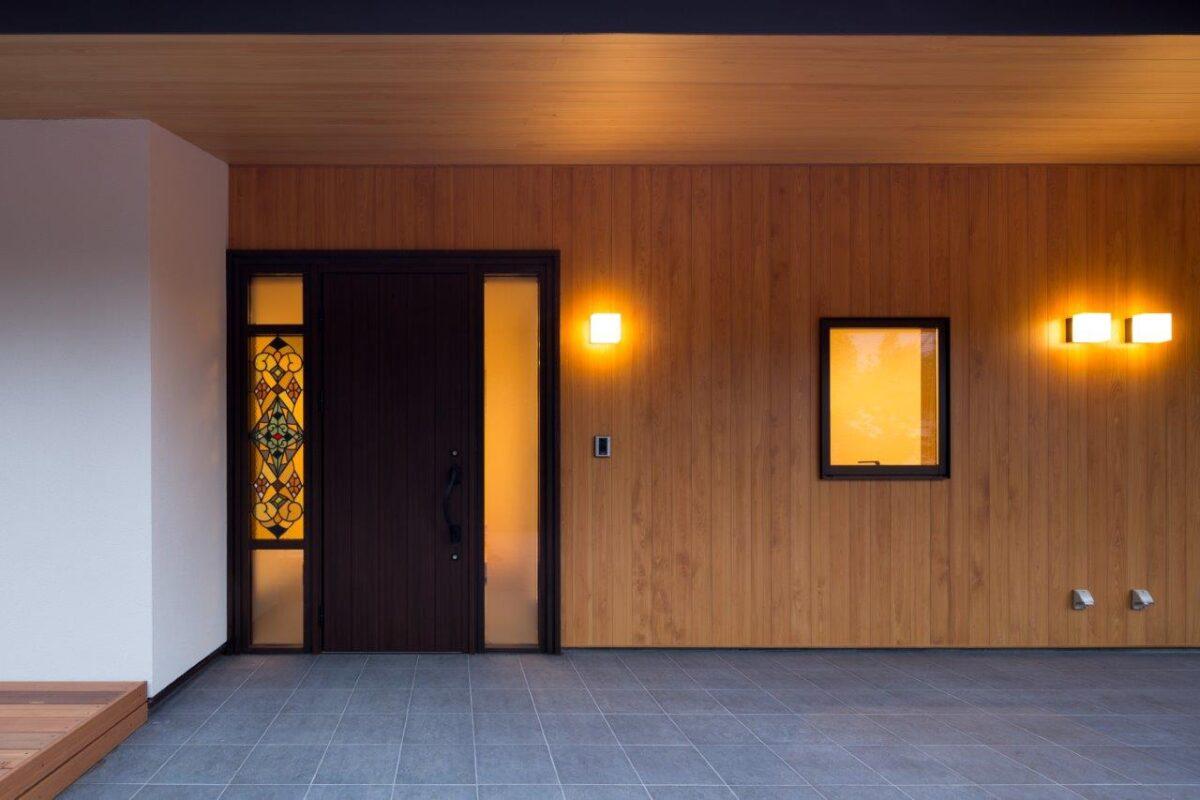


The following materials are now used instead of tataki. Please learn the difference between each of these materials and choose the material that best suits your purpose.
7-1. tile
It is a board-like material made by baking clay or other materials at high temperatures to harden them. Because it is extremely hard and has design characteristics, it is often used to finish floors that are visible to the public, such as porch stairs and approaches, as well as inside entrances. Although it is more expensive than the other materials introduced here, it is a cost-effective material because it looks good and lasts for a long time.
7-2. brick
Like tiles, bricks are also made of fired clay. Unlike tiles, which have a smooth surface, brick has a slightly rough texture that gives it a unique flavor. The surface is slightly prone to chipping, but this makes it less slippery when walking on it when wet.
7-3. concrete
Concrete is a mixture of cement, sand, gravel, and water. Because of its resistance to compression, it is suitable for heavy areas such as garage and parking lot floors. However, since air bubbles and gravel particles tend to appear on the surface, mortar is more commonly used for areas that are visible to the public, such as inside entrances.
7-4. mortar
Mortar is a mixture of cement, sand, and water. Mortar can be finished in a variety of textures, such as smooth surfaces, or by intentionally leaving traces of trowels or brushes. However, mortar is more prone to shrinkage and cracking than concrete finishes.
7-5. natural stone
Natural stone is a flattened stone material quarried from nature. The depth and luxurious design is unique to real stone. Some are more expensive than other materials, and the cost can be high when applied to large areas.
7-6. gravel washout
In this finish, small gravel such as pea gravel or small gravel is mixed with mortar, and water is applied before it dries completely, causing the gravel to float to the surface. The gravel grains form a three-dimensional pattern, creating a unique and deep atmosphere. However, the cost is higher due to the time and effort required for installation.
8. 9 examples of houses with tataki
Here are some examples of fashionable tataki using actual contemporary materials.
8-1. Modern tataki with tile finish
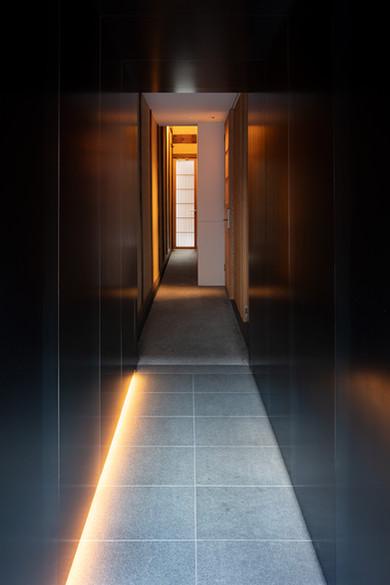


This tile-finished tataki was created in a chic passageway. The floor and walls of heavy colors applied in a limited space, as well as the impressive lighting underfoot, create a space that looks like a tunnel leading to another world.
8-2. Mortar-finished tataki in an old private house
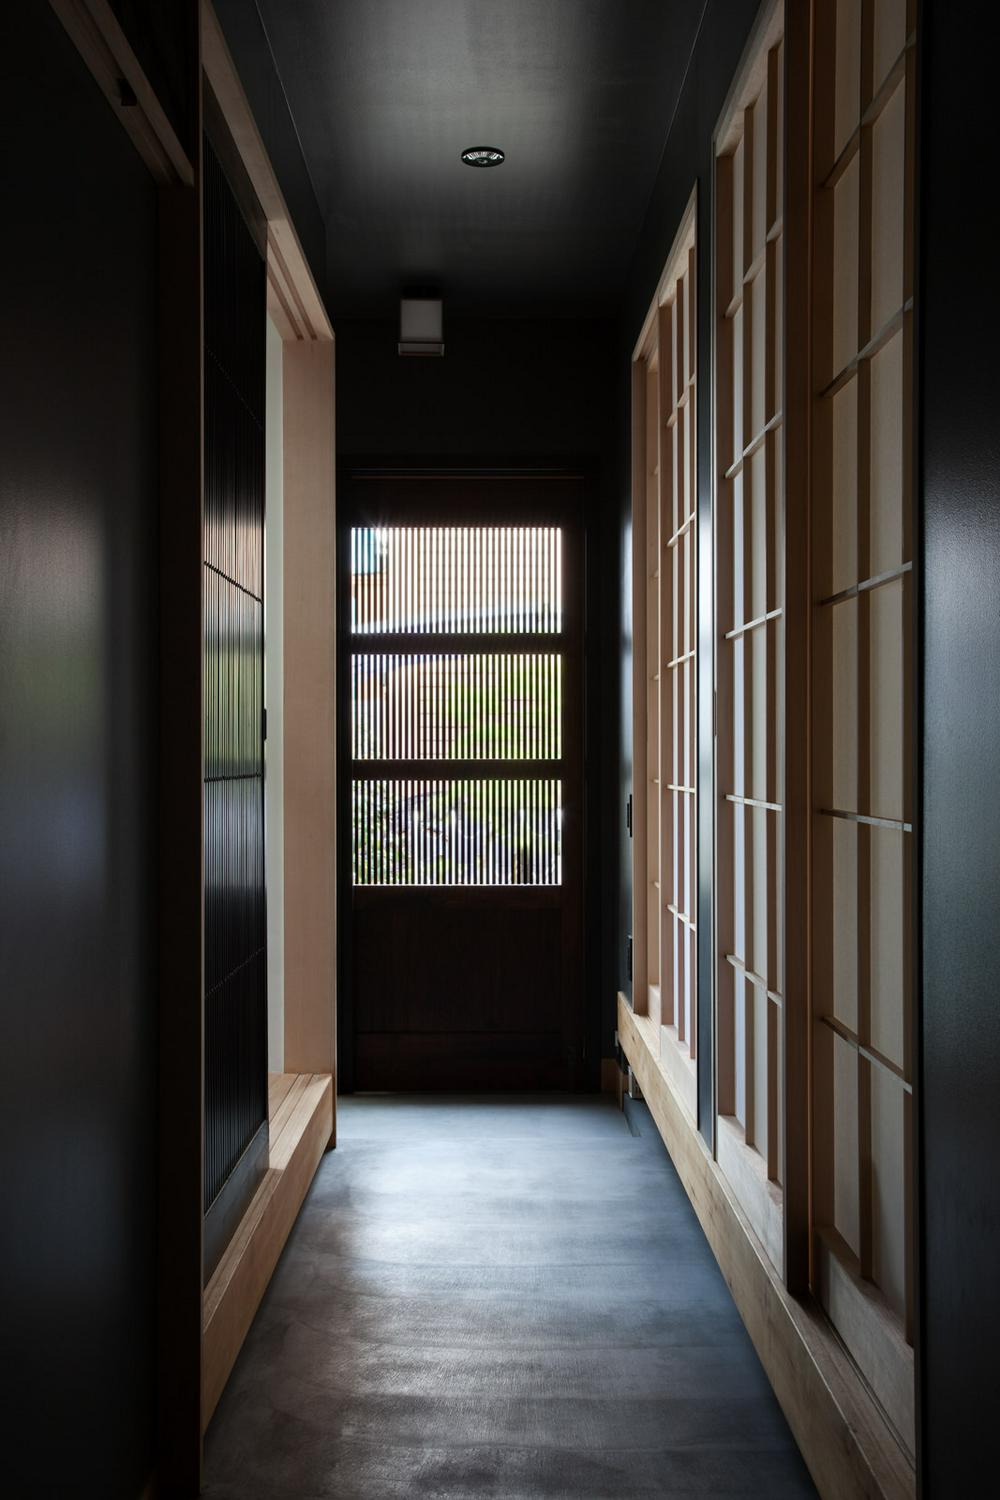


This is a mortar-finished tataki made in an old house. The shadows caused by the smooth yet daring trowel marks left behind give a sense of nostalgia. Another point is that the mortar reflects light from outside, brightening the space.
8-3. Natural stone and gravel washout tataki
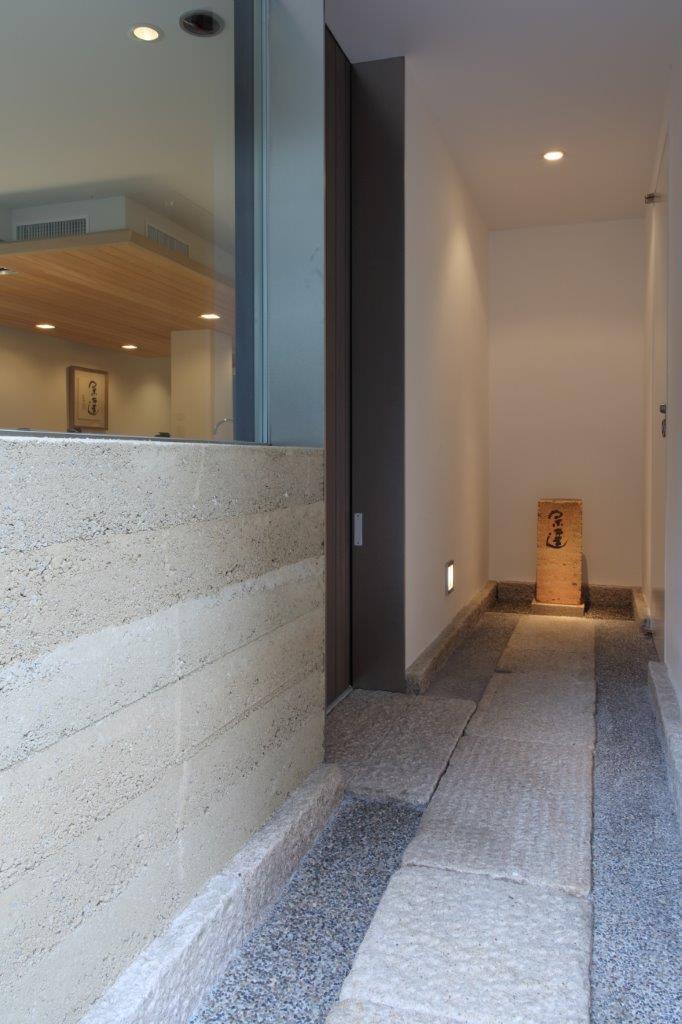


Tataki part is an approach made of natural stone slabs and washed out small gravel. The rugged texture of the natural stone and the delicacy of the washed out soil create an eye-catching contrast between the lighter shades.
8-4. Ooya-stone tataki in green
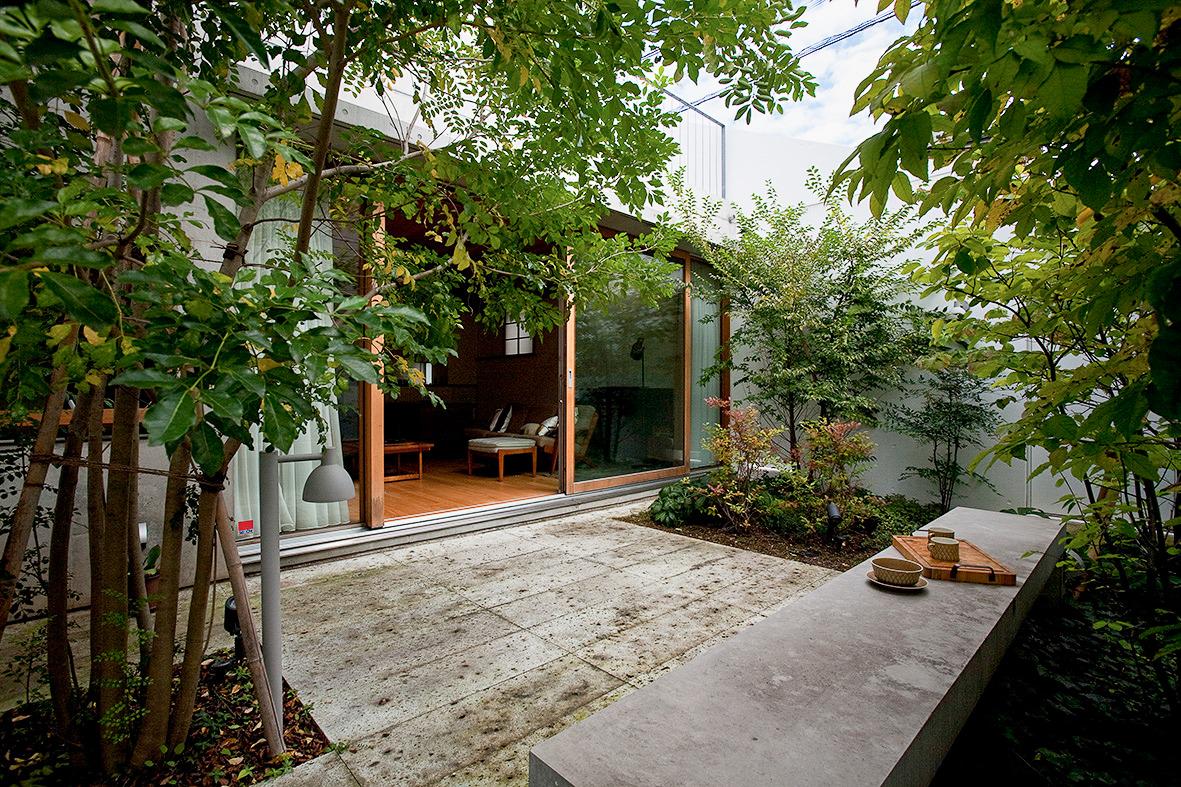


This tataki is paved with Ooya-stone made of volcanic ash. It has a strong presence among the overgrown greenery. The weathered texture contributes to creating a relaxing garden without feeling rigid.
8-5. Simple modern Japanese style tataki
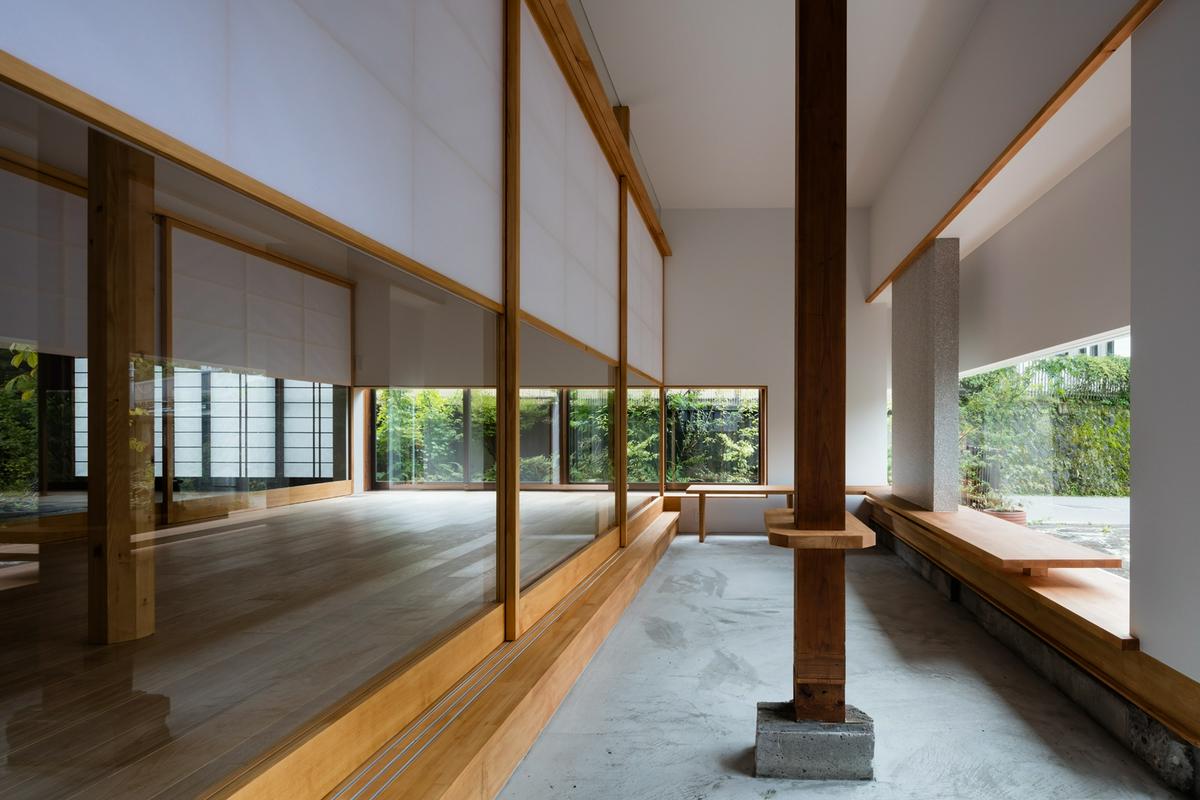


This tataki is a relaxing space created in a simple modern Japanese-style building. The finish without paint marks or luster plays a supporting role and enhances the flavor of the simple interior. It is also noteworthy that the color is brightened to balance the overall design.
8-6. Western-style entrance tataki
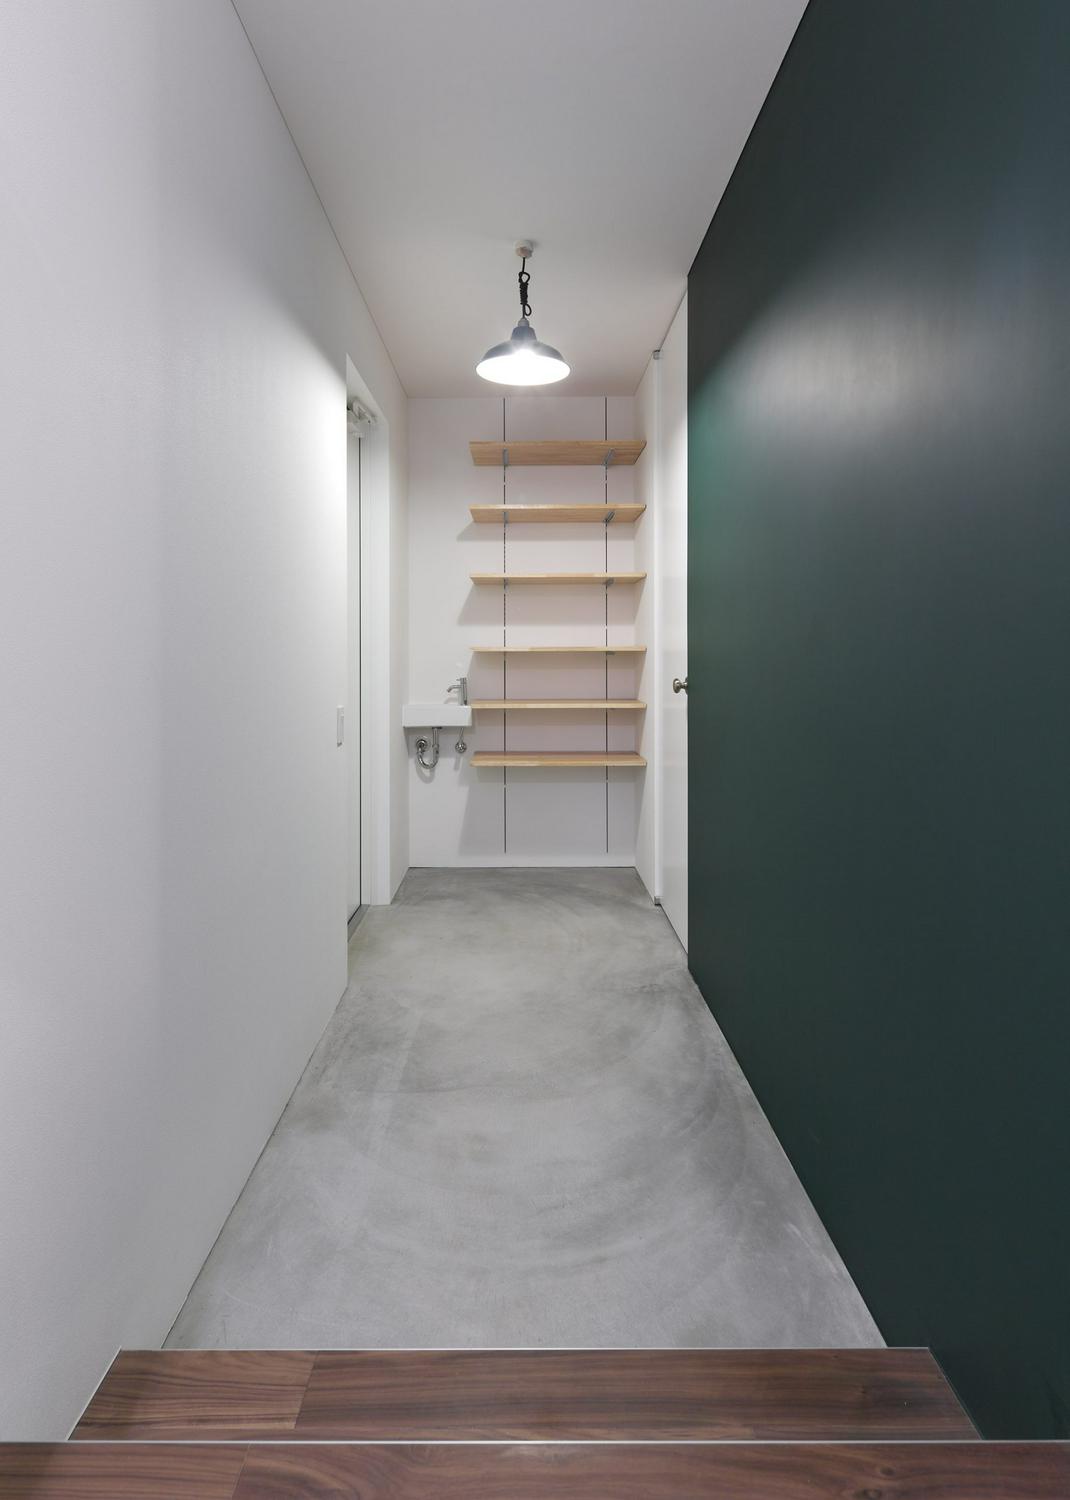


This is a mortar tataki set up inside an apartment-style entrance where artists gather in New York and other places. It is designed in total with the rough atmosphere of lighting, shelves, and hand wash basins. The rustic finish that leaves traces of paint also matches the concept of the interior.
8-7. Tile tataki with wood stove
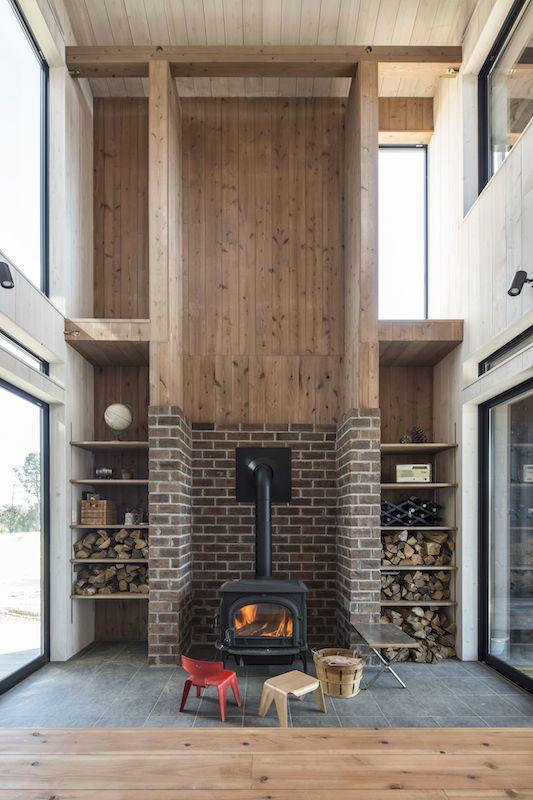


This is a tile tataki made under a wood-burning stove that has a strong presence. Tiles are highly heat resistant, making them an ideal material for installation around a wood stove. Bricks, which are also heat resistant, are applied to the walls, enhancing the warm atmosphere.
8-8. Tataki in the living room
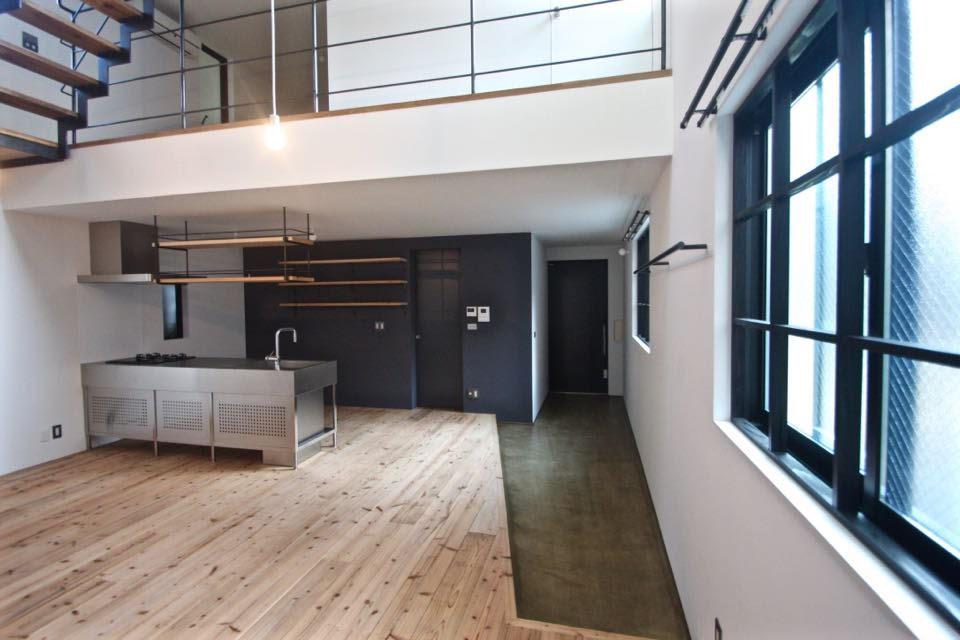


The mortar-finished tataki continues directly from the entrance to the living room. The rough materiality of the mortar is perfectly blended with the industrial feel of the kitchen and the room as a whole.
8-9. Tataki connects two households
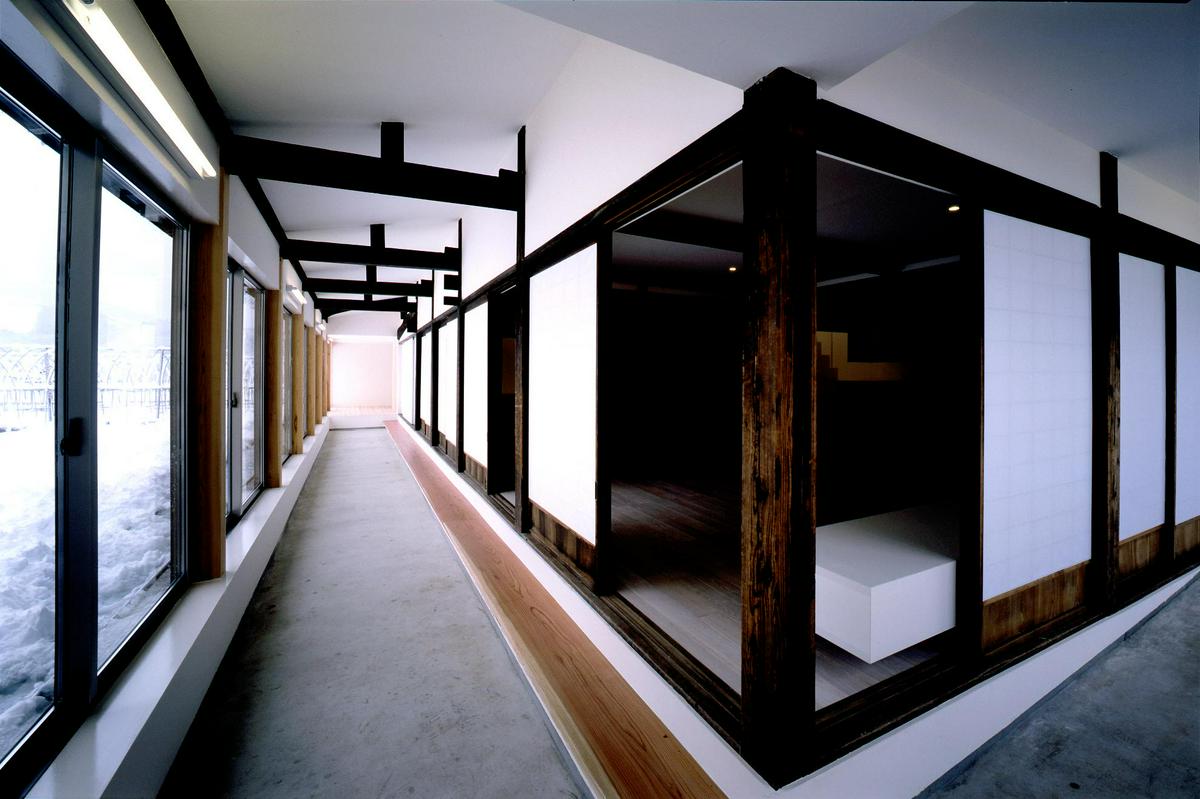


Mortar tataki was installed in the passageway connecting the parent and child households in a renovated two-family house. The heavy columns and beams of the original building and the rustic texture and bright colors of the mortar create a good balance.
9. Summary
Tataki was originally a type of finish that hardened the earthen floor inside the entrance. With proper material blending and careful pounding, it is strong enough to be installed outdoors where it can be exposed to rain.
However, the use of tataki as a finish is decreasing because it is more prone to chipping and scraping than other finishes, is more difficult to install, and takes longer to construct than other finishes. Therefore, the meaning of "tataki" has changed to "doma" (earthen floor), which refers to the area around the entrance where people put on their shoes and walk.
Instead, other materials, such as tile and mortar, are now used as finishes. Each has different designs and advantages, and if the entire space is planned well, a more stylish tataki can be created.
If you are interested in incorporating tataki into your home, why not consult with the architects who designed the examples shown here? japanese-architects.com provides free introductions to architects who have designed buildings with tataki, so please contact us for more information.
Consult with an architectural advisor.
If you are thinking "Then how do I actually incorporate the ideal tataki into my home?" or "I need an expert's opinion on whether or not I should incorporate tataki into my home," please consult with japanese-architects.com's architectural advisors.
Our architectural advisors from design firms will listen to your concerns and wishes. Of course, you are welcome to consult with us even if you just want to ask a simple question such as, "I am having trouble with this". If you would like to hear from a professional, or would like to have someone with experience or a third party take a look at your project, please feel free to take advantage of our free consultation.
In order to build a house without regret, it is recommended that you ask for a professional opinion at least once.

